Plumbing is the system of pipes, fixtures, and appliances that distributes clean water and removes wastewater. It is essential for ensuring sanitation, hygiene, and health.
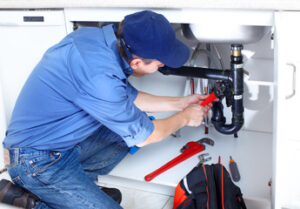
Plumbers install, repair, and maintain plumbing systems in homes and buildings. They also work on industrial plumbing in factories and power plants. They are skilled professionals who use specialized tools and techniques to perform their jobs. Visit https://www.castlerockplumbingllc.com/ for professional help.
Faucet leaks are very common and while they might seem harmless, they can lead to water damage, high water bills, and even mold or mildew. The good news is, most faucet leaks are easy to repair for the do-it-yourselfer. A quick fix for a leaking faucet can save you thousands of dollars and help reduce water waste.
To repair a leaky faucet, first shut off the water supply. This is usually done by turning the valves underneath your sink or around the tub clockwise. Once the water is shut off, you can remove the handle or the cartridge to access the internal parts. Before attempting to disassemble your faucet, check the manual for specific instructions on how to remove the handle or cartridge. You should also identify which kind of faucet you have so you can get the right replacement parts.
Some of the most common faucet leaks are due to worn O-rings or seals. These small parts wear out over time and replacing them can often fix the leak. Other common causes of leaks are loose components or corroded parts. Regularly inspecting your faucets and tightening loose nuts or screws can prevent these issues from developing.
If the valve seat has a rough surface or is covered with mineral buildup, it can’t create a proper seal and this can cause a leak. Using white vinegar, which is gentler than many other household cleaners, can help to clean your faucet valve seats and restore them to a better seal.
The bottom stem (9) on both cartridge and compression faucets is held in place by a plastic O-ring (8). This can also wear out over time, causing a leak. To fix this, rub a little petroleum jelly on the O-ring and put a new one in place. Then screw the stem back in place, tightening it with your wrench.
Some faucets have a seat washer (9). This is a rubber washer that sits on the top of the valve seat and is held in place by a brass screw. If your faucet has this part, you can remove it by prying off the decorative cap on the handle and removing the screw with a screwdriver. You can then replace the washer with a new one and reassemble the faucet.
Repairing a Leaking Faucet
A leaky faucet can be more than an annoyance. Over time, it can cause water damage to your home and property. It can also create a breeding ground for mold and mildew, which poses health risks to your family or guests.
Fortunately, repairing a leaky faucet is typically a straightforward DIY project that can save you the expense and hassle of calling a plumber. Leaking faucets can waste thousands of gallons of water each year, so fixing them quickly is important.
To fix a leaking faucet, first shut off the water supply by turning off the water valve under the sink. Then, remove the handle and take it apart to see what parts need to be replaced or repaired. Some common causes of a leaky faucet include worn washers or O-rings, corroded valve seats, and defective stems or cartridges.
Once you have the necessary replacement parts, reassemble the faucet and turn the water back on to test it for leaks. If the leak persists, it may be time to consult a professional.
Most faucets use a single handle to control the flow of water from the spout. To get to the handle, first pry off or unscrew the decorative cap at the top of the handle with a screwdriver. If the handle is stuck, try wiggling it or gently tapping it. Do not use a metal wrench or bang on the handle — this could break the inner workings of the faucet.
Underneath the handle is a large, six-sided nut that holds the stem in place. To remove it, fit a wrench to the nut and loosen it. Once the nut is loose, you can lift the whole stem out of the faucet. Before you replace the nut, cover it with a few layers of tape to prevent it from scratching the finish of your faucet. You should also wrap the nut with Teflon tape or put some wax on it to help prevent future leaks.
The aerator on the tip of the faucet is another common source of leaks. To prevent this, regularly clean the aerator to eliminate mineral deposits. You can also install a water softener to reduce hard water buildup.
Repairing a Broken Faucet
Over time, even that shiny new faucet that you love so much can become damaged. Unfortunately, not all damage is easy to spot and it isn’t always obvious whether your faucet is a repair or replacement candidate. However, understanding how a faucet works can help you decide if fixing it or replacing it is your best option.
A dripping faucet can be quite an irritation, especially when it wakes you up in the middle of the night or leaves water puddles under your sink. While it may seem like a minor problem, the reality is that leaking faucets not only put extra stress on the water system and waste fresh clean drinking water but also add up to your utility bill every month.
The first thing to do is shut off your water supply valves under the sink one at a time to relieve any pressure in the line. Once you have done that, place a towel in the sink to protect it and catch any dropped parts. Then, you can start working on repairing your broken faucet.
Typically, faucet leaks occur from loose components and tightening them can often fix the problem. Additionally, small parts like rubber washers and O-rings wear out over time and need to be replaced. To keep your faucet in good condition, regularly clean it to prevent mineral and grime buildup. You should also clean the aerator (the part that mixes air and water) to avoid clogs and ensure a steady flow of water.
Another common cause of a leaking faucet is corrosion inside the faucet body that causes the seals and washers to deform and lose their sealing properties. This can be resolved by removing and cleaning the old components, then installing new ones.
While it may take a bit of squirming around under your sink, learning how to repair a broken faucet can be a fairly simple job and will save you the expense of hiring a plumber. All you need is some basic tools and the right know-how. Just make sure you are well-stocked with supplies before you start.
Repairing a Frozen Faucet
When you turn on your outdoor faucet during frigid winter temperatures and only a trickle of water comes out, it is often a sign that some of the pipe’s interior has frozen. Frozen pipes are a ticking time bomb that can lead to leaks, bursts, and extensive water damage inside the home. A frozen faucet typically gives warning signs, such as the sound of gurgling or grinding noises, which means the water is struggling to pass through a blockage.
Immediately shut off the water supply to the affected pipes by closing the main valve, usually located at your home’s water meter or where the main line enters the house. Keep a wet/dry vacuum on hand to remove standing water and sludge from the damaged area. Once the pipes thaw, be sure to call a plumber for professional plumbing repairs. Wrap exposed water pipes with insulation and/or heat tape to help prevent freezing.
Before attempting to thaw your outdoor faucet, first ensure that it is completely shut off by turning the handle counterclockwise to drain all of the water. Next, open the faucet so steam produced by your thawing activities can escape. Begin thawing the pipe with a small section closest to the faucet and work your way back toward the other end of the frozen area. Continue this process until a pencil-sized stream of water flows out of the faucet.
Once the pipe thaws, turn on the faucet and test it for leaks. If you find any cracks or broken sections of the pipe, contact a licensed plumber for professional plumbing repairs. Be sure to turn the water back on after all repairs are complete.
To avoid a frozen faucet, leave your indoor and outdoor faucets dripping during the cold weather. This can reduce the chances of freezing and prevent ice buildup on the pipe’s exterior, which may then cause your pipe to expand. Also, keep the thermostat at a constant temperature to avoid drastic fluctuations and prevent the interior of your home from cooling. You can check out Michigan’s Preventing Frozen Pipes page for more information on preventing and repairing frozen pipes in your home.